How to Easily Remove Wall Vinyl Sticker
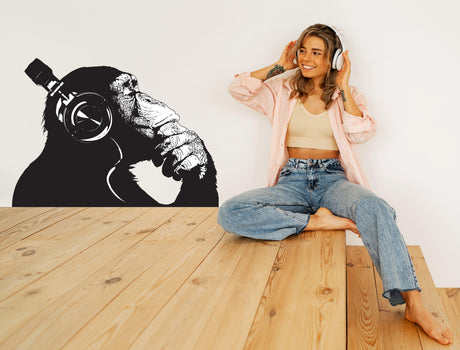
Wall vinyl stickers are a popular choice for home decor. They can add a touch of personality to any room and are often used as a temporary design solution. However, there may come a time when you want to remove these stickers for a change in decor or due to wear and tear. In this article, we will guide you through the process of easily removing wall vinyl stickers. Whether you're a beginner or an experienced DIY enthusiast, this step-by-step guide will help you get the job done efficiently.
Understanding Wall Vinyl Stickers
Before we dive into the removal process, let's take a moment to understand what wall vinyl stickers are. Wall vinyl stickers, also known as wall decals or wall stickers, are adhesive designs or patterns that can be applied directly to walls. They come in various shapes, sizes, and designs, allowing you to customize your living space effortlessly.
Wall vinyl stickers are made from a thin, flexible vinyl material that adheres to smooth surfaces when pressure is applied. This material is durable and long-lasting, ensuring that your wall stickers will stay in place for a considerable amount of time. The flexibility of the vinyl allows it to conform to the contours of your walls, creating a seamless and professional-looking finish.
One of the most significant advantages of wall vinyl stickers is their ease of installation. Unlike traditional wallpaper or paint, which can be time-consuming and messy, wall vinyl stickers can be applied within minutes. They typically come with a backing sheet that you peel off, exposing the adhesive side of the sticker. Once applied to the wall, you can smooth out any air bubbles or wrinkles using a squeegee or a credit card.
When it comes to removing wall vinyl stickers, you'll be pleased to know that they are designed to be removable without causing any damage to your walls. When removed correctly, they do not leave behind any residue or adhesive marks. This makes them an excellent option for those who like to change their decor frequently or for people living in rented spaces.
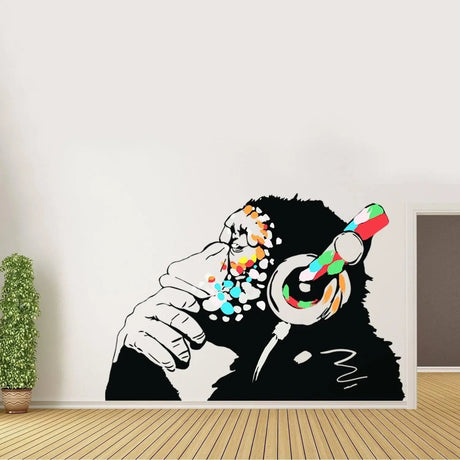
There are several types of wall vinyl stickers available on the market to suit different preferences and needs. Some have a glossy finish, which adds a sleek and shiny look to your walls. On the other hand, there are options with a matte finish, providing a more subtle and understated appearance. The choice between glossy and matte finishes depends on your personal style and the overall aesthetic you want to achieve in your space.
In addition to the finish, wall vinyl stickers also come in different levels of adhesion strength. Some stickers have a stronger adhesive, which ensures that they stay firmly in place even in high-traffic areas or rooms with high humidity levels, such as bathrooms or kitchens. On the other hand, there are stickers with a less aggressive adhesive, making them easier to remove without damaging the paint or wallpaper underneath.
Before starting the removal process, it's essential to consider the type of wall vinyl sticker you have. This will help you determine the most appropriate techniques or tools to use for a smooth and hassle-free removal. If you're unsure about the type of sticker you have or the best removal method, it's always a good idea to consult the manufacturer's instructions or seek advice from a professional.
Preparing for the Removal Process
Before you start removing the wall vinyl stickers, it's important to gather the necessary tools and materials. Proper preparation ensures a smoother and more efficient removal process.
Necessary Tools and Materials
Here are the tools and materials you'll need:
- Heat gun or hairdryer
- Plastic scraper or credit card
- Rubbing alcohol or adhesive remover
- Clean cloth or sponge
- Bucket of warm, soapy water
- Painter's tape or masking tape
Gathering these items before you begin will ensure that you have everything you need within reach.
Safety Precautions
When working with adhesive removers or heat guns, it's important to take some safety precautions. Make sure you are in a well-ventilated area while using any chemicals, and wear gloves to protect your skin. When using a heat gun, be mindful of the high temperatures and avoid touching the nozzle directly. Keep a fire extinguisher nearby, just in case.
Choosing the Right Heat Source
When it comes to removing wall vinyl stickers, heat is your best friend. It helps soften the adhesive, making it easier to peel off. You can choose between using a heat gun or a hairdryer. A heat gun is more powerful and can generate higher temperatures, but a hairdryer can also do the job if you don't have a heat gun handy. Just make sure to set the hairdryer to its highest heat setting.
Using a Plastic Scraper or Credit Card
Once you have applied heat to the wall vinyl sticker, you can start peeling it off. To make the process easier, use a plastic scraper or a credit card to gently lift the edge of the sticker. Be careful not to apply too much pressure, as you don't want to damage the wall underneath. Slowly work your way across the sticker, peeling it off bit by bit.
Removing Residual Adhesive
After you have successfully removed the wall vinyl sticker, you may notice some residual adhesive left on the wall. To remove this sticky residue, you can use rubbing alcohol or an adhesive remover. Apply a small amount of the chosen solution onto a clean cloth or sponge and gently rub the adhesive until it comes off. Be patient and thorough to ensure a clean and smooth wall surface.
Cleaning Up
Once you have removed the wall vinyl stickers and any residual adhesive, it's time to clean up. Fill a bucket with warm, soapy water and use a clean cloth or sponge to wipe down the wall. Make sure to remove any remaining traces of adhesive remover or rubbing alcohol. Rinse the cloth or sponge frequently to prevent spreading the adhesive or residue around. Allow the wall to air dry before proceeding with any further decoration or painting.
Securing Surrounding Areas
Before you begin the removal process, it's a good idea to secure the surrounding areas to protect them from any potential damage. You can use painter's tape or masking tape to create a border around the wall vinyl sticker. This will help prevent any accidental scratches or marks on adjacent surfaces. Take your time to properly tape off the area and ensure that it is well-protected before you start removing the sticker.
Final Thoughts
By following these preparation steps, you'll be well-equipped to tackle the removal of wall vinyl stickers. Remember to prioritize safety, gather all the necessary tools and materials, and take your time to ensure a successful removal process. With patience and care, you can transform your walls and create a fresh canvas for new decorations or a new coat of paint.
Step-by-Step Guide to Removing Wall Vinyl Stickers
Now that you have everything you need let's dive into the step-by-step process of removing wall vinyl stickers. Follow these instructions carefully for an easy and successful removal.
Loosening the Sticker Edges
The first step is to loosen the edges of the sticker. This makes it easier to peel off and reduces the chances of damaging the wall. You can use a heat gun or a hairdryer on medium heat to gently warm the sticker. Hold the heat source about 6-8 inches away from the sticker and move it in a back-and-forth motion. The heat will soften the adhesive, making it easier to remove.
It's important to note that different types of vinyl stickers may require different levels of heat. If you're unsure about the appropriate temperature, start with a lower setting and gradually increase it if needed. Be cautious not to overheat the sticker, as excessive heat can damage the wall surface.
Peeling Off the Sticker
Once the edges are loosened, it's time to start peeling off the sticker. Use a plastic scraper or a credit card to gently lift one corner of the sticker. Slowly peel it back, applying even pressure and working in a downward motion. Take your time, especially if the sticker is large or intricate. If you encounter resistance, carefully reapply heat and continue peeling.
As you peel off the sticker, you may notice some residue left behind on the wall. This is normal, especially if the sticker has been in place for a long time. Don't worry, we'll address how to remove the residue in the next step.
Dealing with Resistant Stickers
Some wall vinyl stickers may be more stubborn and resistant to removal. If you come across a sticker that doesn't peel off easily, you have a few options. First, you can reapply heat using the heat gun or hairdryer. The heat will help soften the adhesive, making it easier to remove.
If heat alone doesn't do the trick, you can try using an adhesive remover. Apply a small amount of rubbing alcohol or adhesive remover to a clean cloth or sponge and gently rub the sticker until it starts to loosen. Be cautious not to saturate the wall with excessive amounts of liquid, as it may damage the paint. It's always a good idea to test the adhesive remover on a small, inconspicuous area of the wall first to ensure it doesn't cause any discoloration or damage.
For particularly stubborn stickers, you may need to combine the heat and adhesive remover methods. Apply heat to soften the adhesive, then use the adhesive remover to further loosen the sticker. Repeat this process as needed until the sticker is fully removed.
Once the sticker is successfully removed, you may still notice some residue or adhesive on the wall. Don't worry, we'll cover how to clean and restore the wall surface in the next section.
Remember, patience is key when removing wall vinyl stickers. Take your time, follow the steps carefully, and your walls will be sticker-free in no time!
Cleaning and Repairing the Wall Post-Removal
Once you have successfully removed the wall vinyl stickers, it's time to clean and repair the wall surface. This step ensures a smooth and flawless finish, ready for a new design or simply a clean look.
Removing Residual Adhesive
Even after the sticker is removed, there might be some residual adhesive left on the wall. To remove it, apply a small amount of rubbing alcohol or adhesive remover to a clean cloth or sponge. Gently scrub the affected area until the adhesive is dissolved. Wipe away any excess liquid with a clean cloth.
Repairing Wall Damage
In some cases, the sticker removal process may cause minor damage to the wall, such as paint chipping or small scratches. To repair these issues, you can use a spackling compound or lightweight wall repair putty. Apply a small amount of the product to a putty knife or scraper and fill in any holes or damaged areas. Once the compound is dry, sand it down gently and apply a fresh coat of paint, if necessary.
Cleaning the Wall Surface
Before you can fully appreciate your clean, sticker-free wall, it's important to give it a thorough cleaning. Fill a bucket with warm, soapy water and dip a clean cloth or sponge into the mixture. Wring out any excess water and gently scrub the entire wall surface. Pay attention to any remaining residue or dirt. Rinse the cloth or sponge frequently to ensure you're not spreading dirt around. Once you've finished cleaning, allow the wall to air dry completely before proceeding with any new design or paint.
Tips and Tricks for Easier Sticker Removal
Removing wall vinyl stickers can sometimes be a tedious task, but these tips and tricks can help make the process easier and more efficient. They can save you time, effort, and minimize any potential damage to your walls.
Using Heat to Facilitate Removal
Heat is your best friend when it comes to removing stubborn wall vinyl stickers. Always try to use a heat gun or hairdryer to soften the adhesive before attempting to peel off the sticker. This will make the removal process smoother and prevent damage to the paint or wall surface.
Using Commercial Adhesive Removers
If you're dealing with a particularly resilient sticker, commercial adhesive removers can come to the rescue. These products are specifically designed to dissolve adhesives without causing damage to the underlying surface. Follow the manufacturer's instructions closely and test the product in a small, inconspicuous area before applying it to the entire sticker.
Remember, patience is key when removing wall vinyl stickers. Take your time, work slowly and gently, and be prepared for any challenges along the way. With the right tools and techniques, you can easily remove wall vinyl stickers and transform your living space as often as you desire.