The laundry room is usually the most technical space in the house. Machines, pipes, detergents, baskets, maybe a boiler or ventilation unit. Walls end up blank or messy, and the room feels like a service corner rather than a part of the home. Laundry decals and removable graphics change that without any renovation. You use flat surfaces that already exist and give them order, clear roles, and a bit of personality.
Vinyl graphics work especially well in laundry rooms because floor space is limited. You cannot add much furniture, but you have doors, side walls, and the fronts of appliances. A well placed laundry sticker on the washer or a calm pattern above the countertop can make the room easier to read and easier to keep tidy. In small US utility rooms and compact European apartments in Estonia and Germany, laundry wall decals let you design the room within the constraints of pipes, vents, and machines.
How can laundry wall decals improve a small or multi purpose laundry room?
Laundry wall decals help when the room is small, shared with a hallway, or combined with storage. They turn blank vertical surfaces into clear visual helpers. Instead of seeing a random collection of bottles, baskets, and hoses, you see defined zones: washing, drying, folding, and storage. This makes daily routines faster and reduces stress in a room that people often want to leave as quickly as possible.
Most laundry rooms suffer from the same problems. There is no central focus, so everything feels temporary. Shelves and hooks are installed over time without a plan. Laundry room wall décor can fix this by forming visual blocks behind these elements. A simple graphic field behind the washer and dryer ties them into one unit. A band of color above the shelf creates a stable line for your eye. Icons and short text on the wall can mark where detergents, cleaning tools, and baskets belong.
Laundry wall decals also help when the room performs several roles at once. In many European homes, the laundry corner shares space with a bathroom or corridor. In US houses, it might sit inside a mudroom or off the kitchen. With graphics you can mark the laundry area clearly, even if there is no physical partition. For example, a vertical strip of graphics behind the machines and a different treatment for the rest of the wall.
You can use the walls to support real tasks rather than just show quotes. Simple visual prompts near the machines help everyone in the household use the equipment correctly. Icons for washing temperatures, reminders about sorting or emptying pockets, or a small stain removal cheat sheet placed near the sink are practical forms of laundry room wall décor that pay off every week.
When you think of decals as part of the workflow, not only as decoration, the laundry room stops being a dead technical space and becomes a compact, well managed workshop.
Where should you place laundry room decals for maximum effect and visibility?
Good placement is more important than the number of graphics. You can achieve more with a few well placed laundry room decals than with many small stickers scattered around. The goal is to cover the surfaces you look at most while washing, drying, and folding, without blocking access or creating visual noise.
The main zones to consider are:
- the wall directly behind or above the washer and dryer
- the wall next to a sink or countertop used for soaking and folding
- the interior or exterior of the door, especially in closet style laundry rooms
- the sides of tall cabinets where you store detergents and cleaning supplies
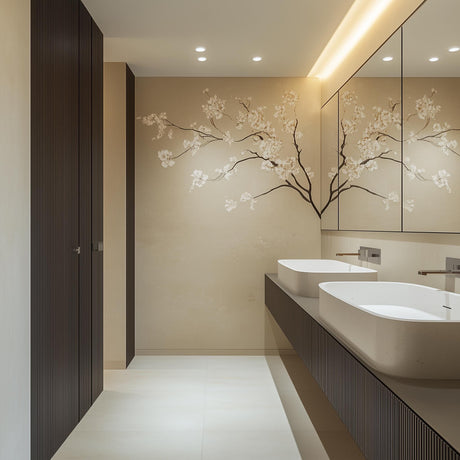
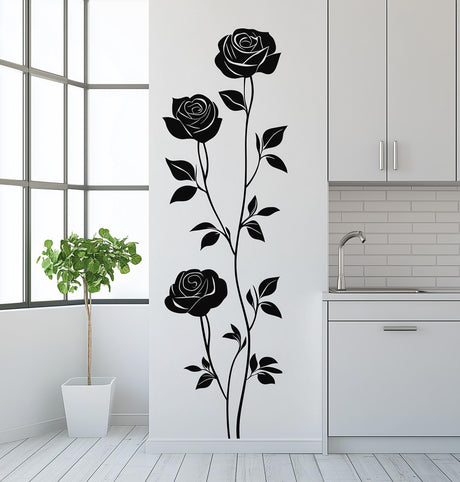
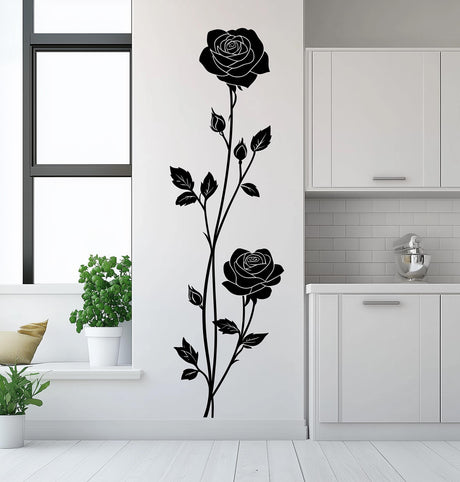
Behind the machines, laundry wall decals can visually frame the entire working area. A clear rectangular field or soft pattern makes the machines feel built in even if they stand alone. Above this field you can place a simple title or graphic that marks the area without shouting. In narrow rooms, a vertical layout works better. In wide rooms, a horizontal design that stretches across both machines keeps the space unified.
On the door, laundry decals for door surfaces can give you a clean face for the room. This is useful when the laundry is tucked into a hallway or shared space. You can use a large sticker laundry design with text, symbols, or a pattern that makes the door part of the interior instead of a random white slab. From the inside, the same door can carry a small checklist: what to check before you start the wash or before you leave the room.
Cabinet sides are ideal for more functional graphics. Small icons that mark storage categories, simple arrows that direct where baskets should go, or outlines that show where a folding table can be leaned when not in use are all practical uses of laundry room decals. Because these areas are close to eye level, they are easier to read than labels placed low or hidden on shelves.
The more precisely you connect each decal to a specific task, the more value you get from every piece of vinyl. Graphics stop being pure decoration and become part of how the room explains itself to anyone who walks in.
How to choose laundry decals and laundry sticker materials for humid and high traffic rooms?
Laundry rooms deal with steam, temperature swings, and constant contact. Machines vibrate, doors open and close all day, and people brush past narrow paths with baskets. This means not every decorative vinyl is suitable. When you choose laundry decals and each laundry sticker, focus on materials that are designed for wipeable, humid environments.
For walls, look for vinyl that is washable and rated for use in kitchens or bathrooms. These laundry wall decals usually have a sealed surface that does not absorb moisture or detergent splashes. A matte or satin finish works better than very glossy film because it hides small smudges and unevenness in older walls, especially in European buildings with plaster surfaces.
For doors and cabinet fronts, a medium thickness film is a good choice. It should be flexible enough to follow slight textures on painted wood or laminate, but strong enough not to tear when you peel it off. Laundry decals for door panels should also tolerate frequent touching around handles and edges. If you expect children to use the room, test a sample at child height to see how it behaves under repeated contact.
For appliances, check that the adhesive is safe for enameled metal and that the film can handle slight warmth during machine operation. A small laundry sticker on the front of a washing machine or dryer should stay flat, not curl when the drum is running and the surface warms up a little.
A simple selection checklist:
- washable surface, safe for light scrubbing with a soft sponge
- adhesive described as removable or peel and stick
- compatibility with painted walls, tiles, and appliance fronts
- resistance to humidity and occasional condensation
In both US and European homes, laundry rooms often sit near external walls, basements, or unheated spaces. If your wall feels cold or you see signs of condensation, avoid very delicate designs with ultra thin lines. Larger shapes and bold elements will hold better over time.
Choosing materials with these realities in mind gives you a set of laundry decals that still look fresh after many wash cycles, not only during the first week.
How to install and remove laundry room decals on walls, doors, and appliances?
Installation in a laundry room follows the same basic rules as in a kitchen or bathroom, but with extra attention to past moisture and detergent residue. Washing machines often spray small amounts of water around, and lint or powder builds up on nearby surfaces. If you place decals on top of that layer, edges will lift and cleaning will become more complicated.
Start by washing the surfaces with a mild cleaner. For walls and doors, use a solution of dish soap and warm water to remove dust and grease, then wipe again with clean water to remove soap. Let everything dry completely. For appliance fronts, wipe with a suitable cleaner and wait until the metal is dry and at room temperature.
Before covering a large area, use a small piece from your set as a test laundry sticker. Place it in a discreet spot on each type of surface you plan to use: wall, door, cabinet, appliance. Wait a few days, run the machines as normal, and clean as usual. If the sample holds well and peels without pulling paint or leaving heavy residue, you can proceed.
When installing larger laundry wall decals:
- lightly mark straight lines with painter’s tape as a guide
- peel only part of the backing at first and align the top edge
- smooth from the center outward with a soft cloth or squeegee
- pay attention to edges near corners, pipes, and outlets
For doors, stand back several times during placement to check alignment with panels and handles. For appliance fronts, avoid covering important labels or ventilation slots. If you plan to open and close doors many times a day, press the edges firmly to avoid catching.
Removal later is simple if you take your time. Warm the decal gently with a hair dryer at low power and peel slowly at a shallow angle. On tile and appliance metal, adhesive usually releases cleanly. On painted doors and walls, the result depends on how well the surface was prepared and the quality of the paint. If any traces of glue remain, remove them with a soft cloth and gentle cleaner rather than scraping.
With this approach, laundry room decals act as a reversible upgrade. You can redesign the room when you change machines, repaint, or move to a new home, without leaving marks behind.
How to use laundry decals for door and large sticker laundry designs in US and European homes?
Doors and larger graphic fields are powerful tools in small service rooms. In many US houses, the laundry is behind a dedicated door off a hallway or kitchen. In European apartments in Estonia and Germany, the washing machine may sit in a small room, in a shared corridor, or even inside a bathroom. In all these cases, doors become natural carriers of information and mood.
Laundry decals for door fronts can mark the space clearly. A simple typography design with the word "Laundry", a set of icons, or a symbolic graphic helps everyone find the right door in a hallway with several similar panels. On the inside of the door, you can place a more functional design: a stain removal guide, a gentle reminder about cleaning the lint filter, or icons that show which baskets are for which load.
Large sticker laundry compositions work well on walls that you see from outside the room or while standing at the machines. For example, a big central graphic above stacked washer and dryer units can make a tall, narrow niche feel complete. A wide band of graphics above a countertop where you fold clothes can visually support that horizontal work surface.
In US homes with more floor space, you can combine a large graphic with smaller labels and icons that mark storage and accessory zones. In compact European layouts, a single large field plus a few micro decals is often enough. The goal is to avoid overloading walls that are already busy with pipes, meters, or ventilation.
Across regions, the same principles apply:
- use large elements to anchor the room and set the mood
- use small decals to support actions and organization
- keep graphics away from constant splash zones and direct heat
- make sure any text is readable from normal working distance
When you plan laundry decals this way, every piece has a job. Some guide, some explain, some simply make the room more pleasant. The result is a laundry space that feels less like a back room and more like an integrated, thought through part of the home.
Read less